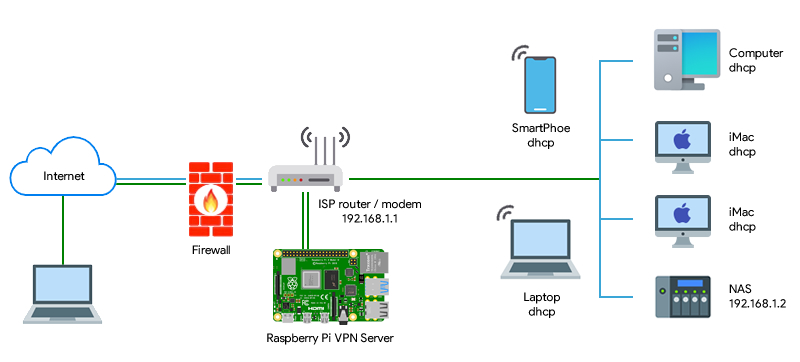
Vpn server for Raspberry Pi
If you are looking to set up your own VPN server on a Raspberry Pi, you have come to the right place! Raspberry Pi is a versatile mini-computer that can be used for a plethora of projects, including hosting your very own VPN server.
A VPN (Virtual Private Network) is a service that encrypts your internet connection and routes it through a server to protect your online privacy and security. By setting up a VPN server on your Raspberry Pi, you can access your home network securely from anywhere in the world, bypass geo-restrictions, and protect your data from hackers and snoopers.
Setting up a VPN server on Raspberry Pi is not as complicated as it sounds. In this guide, we will walk you through the steps to configure your Raspberry Pi as a VPN server using OpenVPN, one of the most popular free and open-source VPN protocols.
Requirements
- Raspberry Pi (any model will work, but Raspberry Pi 4 is recommended for better performance)
- MicroSD card with Raspbian installed
- Power supply
- Ethernet cable (for stable internet connection)
- Computer or smartphone with SSH client
Installation
Before we begin, make sure your Raspberry Pi is up to date. Open a terminal window and run the following commands:
sudo apt updatesudo apt upgrade
Next, install OpenVPN on your Raspberry Pi by running the following command:
sudo apt install openvpn
Once OpenVPN is installed, you need to generate the necessary SSL certificates and keys. Open a terminal window and run the following command:
sudo mkdir /etc/openvpn/easy-rsasudo cp -r /usr/share/doc/openvpn/examples/easy-rsa/3.0/* /etc/openvpn/easy-rsacd /etc/openvpn/easy-rsasudo ./easyrsa init-pkisudo ./easyrsa build-ca nopasssudo ./easyrsa gen-req server nopasssudo ./easyrsa sign-req server serversudo ./easyrsa gen-dhsudo openvpn --genkey --secret /etc/openvpn/ta.key
Now, create the OpenVPN server configuration file by running the following command:
sudo nano /etc/openvpn/server.conf
Copy and paste the following configuration into the file:
dev tun
proto udp
port 1194
ca /etc/openvpn/easy-rsa/pki/ca.crt
cert /etc/openvpn/easy-rsa/pki/issued/server.crt
key /etc/openvpn/easy-rsa/pki/private/server.key
dh /etc/openvpn/easy-rsa/pki/dh.pem
server 10.8.0.0 255.255.255.0
ifconfig-pool-persist ipp.txt
cipher AES-256-CBC
auth SHA256
tls-auth /etc/openvpn/ta.key 0
user nobody
group nogroup
persist-key
persist-tun
status openvpn-status.log
verb 3
Save and exit the editor. Start the OpenVPN service by running the following command:
sudo systemctl start openvpn@server
That’s it! Your Raspberry Pi is now configured as a VPN server using OpenVPN. You can now connect to your VPN server from any device using an OpenVPN client.
Remember to secure your VPN server by setting up firewall rules to restrict access, enabling two-factor authentication, and regularly updating your system.
Conclusion
Setting up a VPN server on a Raspberry Pi is a great way to enhance your online security and privacy. With OpenVPN, you can create your own VPN server with ease and enjoy a secure connection from anywhere in the world. Follow this guide to configure your Raspberry Pi as a VPN server and protect your data from prying eyes.
