How to Transfer Your Domain from Squarespace
So you’ve decided to transfer your domain from Squarespace to another provider? Great choice! Transferring your domain is a simple process that can be completed in just a few steps. In this article, we’ll walk you through the process of transferring your domain from Squarespace to another domain registrar.
Step 1: Unlock Your Domain
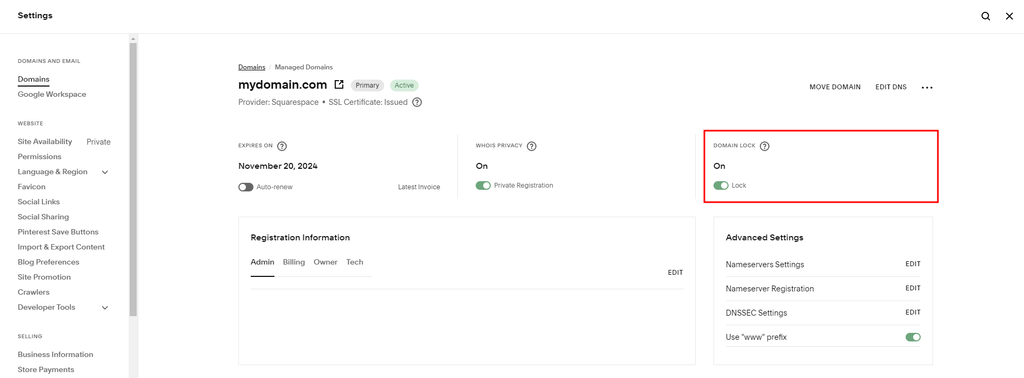
The first step in transferring your domain from Squarespace is to unlock your domain. To do this, log in to your Squarespace account and navigate to the Domains section. Find the domain you want to transfer and click on it. Look for an option to unlock your domain and follow the on-screen instructions. Once your domain is unlocked, you’ll receive a confirmation email.
Step 2: Obtain an Authorization Code
After unlocking your domain, the next step is to obtain an authorization code. This code is a security measure that ensures the transfer is authorized by the domain owner. To get your authorization code, go back to the Domains section in your Squarespace account and look for an option to request the code. Once you’ve requested the code, Squarespace will email it to you.
Step 3: Choose a New Domain Registrar
Now that you have your authorization code, it’s time to choose a new domain registrar. There are many domain registrars to choose from, so take some time to research and find the one that best suits your needs. Some popular domain registrars include GoDaddy, Namecheap, and Google Domains. Once you’ve selected a registrar, sign up for an account and initiate the domain transfer process.
Step 4: Initiate the Domain Transfer
To initiate the domain transfer, log in to your new domain registrar account and look for an option to transfer a domain. Enter the domain you want to transfer and follow the on-screen instructions. You will need to provide the authorization code you received from Squarespace. Once you’ve entered all the required information, submit the transfer request.
Step 5: Confirm the Transfer
After you’ve submitted the transfer request, you will need to confirm the transfer. Squarespace will send you an email with a link to confirm the transfer. Click on the link and follow the instructions to complete the transfer process. Once the transfer is confirmed, your domain will be moved to your new registrar.
Step 6: Update Your DNS Settings
Once the transfer is complete, don’t forget to update your DNS settings. This will ensure that your domain points to the correct website. Log in to your new domain registrar account and look for an option to update DNS settings. Enter the DNS information provided by your hosting provider and save the changes. It may take some time for the changes to propagate, so be patient!
Step 7: Verify the Transfer
After updating your DNS settings, it’s important to verify that the transfer was successful. Visit your domain in a web browser to check that it loads correctly. You can also use online tools like DNS Checker to verify that your domain is pointing to the correct IP address. If everything looks good, congratulations! You’ve successfully transferred your domain from Squarespace.
Conclusion
Transferring your domain from Squarespace is a straightforward process that can be completed in just a few steps. By following the steps outlined in this article, you can easily move your domain to a new registrar and enjoy the benefits of better services and pricing. So what are you waiting for? Start the transfer process today and take control of your domain!
