How to Set Up a VPN Server on Raspberry Pi
Do you want to increase security and privacy on your network? Setting up a VPN server on your Raspberry Pi is a great way to achieve this. In this tutorial, we will guide you through the process step by step.
What is a VPN?
A Virtual Private Network (VPN) allows you to create a secure connection to another network over the internet. It encrypts your internet traffic and masks your IP address, providing you with enhanced security and privacy.
Why Use a Raspberry Pi?
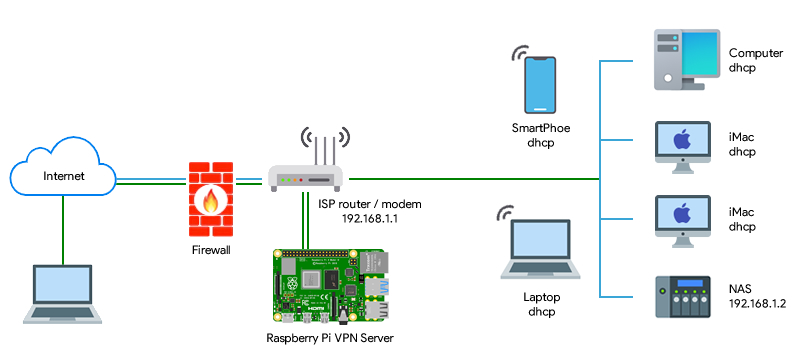
Raspberry Pi is a versatile and affordable mini computer that can be used for various projects, including running a VPN server. It consumes low power and is small in size, making it an ideal choice for setting up a personal VPN server.
Steps to Set Up a VPN Server on Raspberry Pi
Step 1: Install Raspbian OS
Before setting up the VPN server, make sure you have Raspbian OS installed on your Raspberry Pi. You can download the latest version of Raspbian from the Raspberry Pi website and follow the installation instructions.
Step 2: Install OpenVPN
OpenVPN is an open-source software that is widely used for setting up VPN servers. You can install OpenVPN on your Raspberry Pi using the following command:
sudo apt-get update
sudo apt-get install openvpn
After the installation is complete, you will need to configure OpenVPN by following the official OpenVPN documentation.
Step 3: Generate Certificates and Keys
To secure your VPN connection, you will need to generate certificates and keys for authentication. You can use the Easy-RSA tool to generate these files.
Make sure to keep these files secure as they are essential for setting up and connecting to the VPN server.
Step 4: Configure OpenVPN Server
Once you have generated the certificates and keys, you will need to configure the OpenVPN server settings. This includes setting up encryption, authentication, and network settings.
Step 5: Start the OpenVPN Server
After configuring the server, you can start the OpenVPN service using the following command:
sudo systemctl start openvpn@server
You can also enable the service to start on boot by running the following command:
sudo systemctl enable openvpn@server
Connecting to the VPN Server
Once the VPN server is up and running, you can connect to it from any device that supports OpenVPN. You will need the client configuration file and the certificates and keys generated earlier.
Conclusion
Setting up a VPN server on Raspberry Pi is a cost-effective way to enhance the security and privacy of your network. By following the above steps, you can create your VPN server and enjoy secure internet browsing.