Setting Up a DMARC Record for Your Domain
DMARC, which stands for Domain-based Message Authentication, Reporting, and Conformance, is an email authentication protocol that helps protect your domain from phishing attacks and email spoofing. By setting up a DMARC record for your domain, you can ensure that only legitimate emails sent from your domain are delivered to your recipients’ inboxes.
Setting up a DMARC record may sound complicated, but it’s actually quite straightforward. In this article, we’ll walk you through the process of creating and implementing a DMARC record for your domain.
Step 1: Understand the Basics of DMARC
Before you can set up a DMARC record for your domain, it’s important to understand the basics of how DMARC works. DMARC works by allowing domain owners to publish policies on how their emails should be authenticated. These policies are published in a DNS record, which tells email servers how to handle emails that fail authentication.
There are three main components of a DMARC record: the policy, the reporting address, and the percentage tag. The policy specifies what action should be taken if an email fails authentication, such as quarantine or reject. The reporting address is where DMARC reports should be sent, and the percentage tag specifies what percentage of emails should be subjected to the policy.
Step 2: Create a DMARC Record
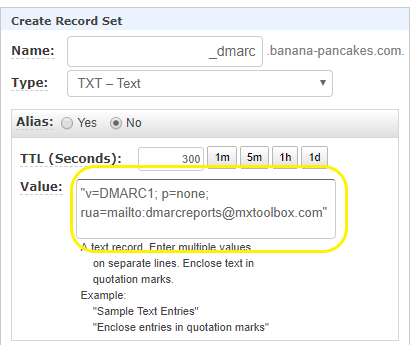
Creating a DMARC record involves adding a TXT record to your domain’s DNS settings. The TXT record should contain the DMARC policy, the reporting address, and the percentage tag. You can use a DMARC record generator to help you create the record, or you can manually create it.
Here’s an example of a DMARC record:
v=DMARC1; p=quarantine; rua=mailto:dmarc@example.com; pct=100;
In this example, the policy is set to quarantine, which means that emails that fail authentication will be sent to the recipient’s spam folder. The reporting address is set to dmarc@example.com, and 100% of emails will be subjected to the policy.
Step 3: Implement the DMARC Record
Once you’ve created the DMARC record, you’ll need to implement it by adding it to your domain’s DNS settings. This involves accessing your domain registrar or DNS hosting provider’s control panel and adding the TXT record with the DMARC policy, reporting address, and percentage tag.
After you’ve added the DMARC record to your DNS settings, it may take up to 48 hours for the changes to propagate. During this time, be sure to monitor your email deliverability and DMARC reports to ensure that everything is set up correctly.
Step 4: Monitor and Fine-Tune Your DMARC Record
Setting up a DMARC record is just the first step in protecting your domain from phishing attacks and email spoofing. To ensure that your DMARC record is effective, it’s important to regularly monitor and fine-tune it. Check your DMARC reports regularly to identify any issues or inconsistencies and make adjustments as needed.
By following these steps and regularly monitoring your DMARC record, you can help protect your domain and your email recipients from phishing attacks and email spoofing. Setting up a DMARC record may seem daunting at first, but with the right guidance and tools, you can easily secure your domain’s email authentication.
