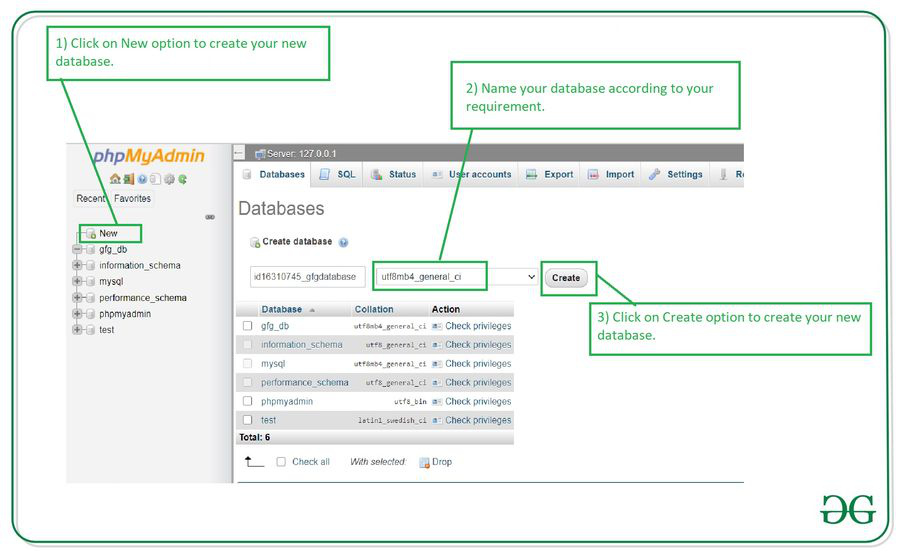
Adding a New Database in Phpmyadmin
Phpmyadmin is a popular tool used to manage MySQL databases. If you are looking to add a new database in Phpmyadmin, you’re in the right place. In this article, we will guide you through the process step by step.
Step 1: Access Phpmyadmin
The first step is to access Phpmyadmin. You can do this by going to your web browser and typing in your server’s URL followed by “/phpmyadmin”. For example, if your server’s URL is “example.com”, you would type in “example.com/phpmyadmin”.
Step 2: Log in
Once you have accessed Phpmyadmin, you will need to log in. Enter your username and password to proceed.
Step 3: Navigate to the Databases Tab
After logging in, you will see a list of databases on the left-hand side of the screen. Click on the “Databases” tab to proceed.
Step 4: Add a New Database
Once you are in the “Databases” tab, you will see an option to “Create Database”. Click on this option to add a new database.
Step 5: Enter Database Name
You will be prompted to enter a name for your new database. Choose a name that is relevant to the data you will be storing in the database.
Step 6: Set Collation (Optional)
Collation refers to the set of rules that determine how data is sorted and compared in the database. You can choose a collation from the dropdown menu, or leave it as the default setting.
Step 7: Click on Create
Once you have entered the database name and set the collation (if desired), click on the “Create” button to finalize the creation of your new database.
Step 8: Verify the Database
You should now see your new database listed on the left-hand side of the screen. Congratulations, you have successfully added a new database in Phpmyadmin!
Adding a new database in Phpmyadmin is a simple process that can be completed in just a few steps. By following the steps outlined in this article, you can easily create a new database for your website or application.
