How to Configure Out of Office in Outlook
Are you going on vacation and want to set up an out of office message in Outlook? Or maybe you just need to enable it for the day because you’re working remotely. Whatever the case may be, configuring your out of office (OOO) reply in Outlook is a simple and straightforward process. In this article, we’ll guide you through the steps to set up your out of office message in Outlook.
Step 1: Open Outlook
The first step is to open your Outlook application. If you’re using Outlook on the web, log in to your account. If you’re using the desktop version, launch the application on your computer.
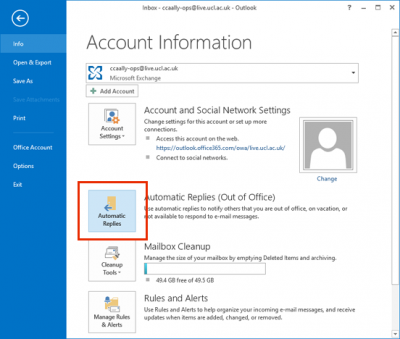
Step 2: Access the Automatic Replies Settings
Once you have Outlook open, navigate to the “File” tab on the top left corner. Click on “File” and select “Automatic Replies” from the dropdown menu.
Step 3: Enable Automatic Replies
Next, check the box next to “Send automatic replies.” You will see two options: one for setting a start and end time for your out of office message, and another for creating a message for inside your organization and a separate message for outside your organization.
Step 4: Create Your Out of Office Message
Now it’s time to craft your out of office message. In the text boxes provided, write the message you want to display to your colleagues and clients while you’re away. You can include information such as the dates you’ll be out, who to contact in your absence, and when you’ll return.
Step 5: Set a Time Frame
If you selected the option to set a start and end time for your out of office message, enter the dates and times accordingly. This will ensure that your automatic reply is only active during the specified time frame.
Step 6: Save Your Changes
Once you’ve completed all the above steps, click on the “OK” or “Apply” button to save your out of office settings. Your automatic replies will now be enabled, and anyone who sends you an email will receive your out of office message.
Step 7: Disable Automatic Replies
When you return from your vacation or remote work situation, don’t forget to turn off your out of office message. Simply follow the same steps outlined above and uncheck the box next to “Send automatic replies.” Your automatic replies will then be disabled.
Configuring your out of office message in Outlook is a quick and easy process that ensures your colleagues and clients are informed of your absence. By following these simple steps, you can set up your out of office message with confidence and peace of mind.
So next time you’re planning a vacation or working remotely, remember to configure your out of office message in Outlook to keep everyone in the loop. Happy configuring!
