How to Export Contacts from Outlook 2010 to CSV
Are you looking to export your contacts from Outlook 2010 to a CSV file? This can be a useful task if you want to back up your contacts, move them to another email account, or simply keep them for your records.
Fortunately, Outlook 2010 makes it easy to export your contacts to a CSV file with just a few simple steps. In this guide, we will walk you through the process of exporting your contacts from Outlook 2010 to a CSV file.
Step 1: Open Outlook 2010
The first step is to open Outlook 2010 on your computer. If you haven’t already done so, go ahead and launch the Outlook 2010 application.
Step 2: Click on the “File” tab
Once Outlook 2010 is open, click on the “File” tab in the top left corner of the window. This will open a drop-down menu with several options.
Step 3: Select “Options”
From the drop-down menu, select “Options.” This will open the Outlook Options window, where you can adjust various settings and preferences.
Step 4: Click on “Advanced”
In the Outlook Options window, click on the “Advanced” tab on the left-hand side. This will display advanced settings for Outlook 2010.
Step 5: Click on “Export”
In the Advanced settings, scroll down until you find the “Export” section. Click on the “Export” button to begin the export process.
Step 6: Select “Export to a file”
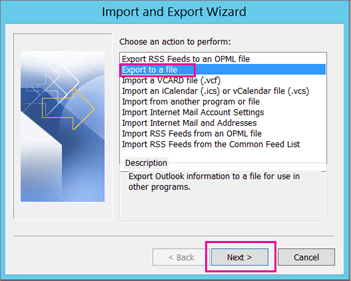
In the Import and Export Wizard window, select “Export to a file” and then click “Next.” This will allow you to choose the file type for the export.
Step 7: Choose “Comma Separated Values (CSV)”
On the next screen, select “Comma Separated Values (CSV)” as the file type to export. This is the format that is commonly used for exporting contacts to a CSV file.
Step 8: Select the Contacts folder
After choosing the file type, select the Contacts folder that you want to export. You can choose to export all contacts or select specific contacts to export.
Step 9: Save the exported file
Choose a location on your computer where you want to save the exported CSV file. You can also choose a name for the file before saving it.
Step 10: Complete the export process
Once you have selected the Contacts folder and saved the file, click “Next” to complete the export process. Outlook 2010 will export your contacts to the CSV file in the selected location.
And that’s it! You have successfully exported your contacts from Outlook 2010 to a CSV file. You can now use this file to import your contacts into another email account or keep it as a backup.
Exporting contacts to a CSV file in Outlook 2010 is a simple and useful process that can help you manage your contacts more efficiently. Follow the steps outlined in this guide to quickly and easily export your contacts to a CSV file.
