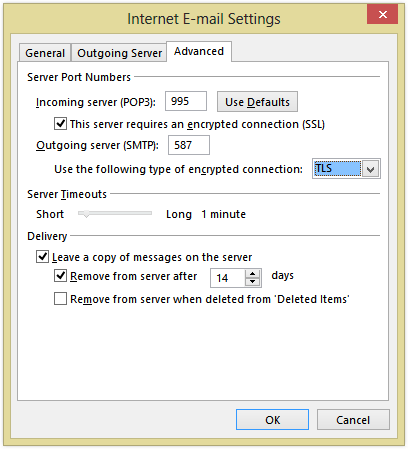
Internet Email Settings POP3
Configuring your Internet email settings for POP3 can sometimes feel like a daunting task, but with the right guidance, it can be a breeze. POP3, which stands for Post Office Protocol version 3, is a standard protocol used to receive emails from a remote server to your local device. In this article, we will walk you through the steps to set up your POP3 email settings and ensure a smooth email experience.
Step 1: Accessing Email Settings
The first step in configuring your Internet email settings for POP3 is to access your email account settings. This can usually be done through the settings menu of your email client, such as Outlook, Thunderbird, or Apple Mail. Look for an option that allows you to add a new email account or modify an existing one.
Step 2: Entering Email Information
Once you have accessed the email settings, you will need to enter the necessary information to set up your POP3 account. This includes your email address, username, password, incoming mail server (POP3), and outgoing mail server (SMTP). Your email provider will usually have this information readily available on their website or through customer support.
Step 3: Configuring Server Settings
Next, you will need to configure the server settings for your POP3 account. The incoming mail server (POP3) should be set to ‘pop.yourdomain.com’ or ‘mail.yourdomain.com’, replacing ‘yourdomain.com’ with your actual domain name. The outgoing mail server (SMTP) should be set to ‘smtp.yourdomain.com’ or ‘mail.yourdomain.com’.
- Incoming Mail Server (POP3): pop.yourdomain.com
- Outgoing Mail Server (SMTP): smtp.yourdomain.com
Step 4: Encryption and Authentication
To ensure the security of your email communication, it is recommended to enable encryption and authentication for your POP3 account. This can usually be done through the advanced settings of your email client. Select the option to use SSL/TLS encryption for both incoming and outgoing mail, and enable authentication using your email username and password.
Step 5: Testing Your Settings
Once you have entered all the necessary information and configured the server settings, it is time to test your POP3 email settings. Send yourself a test email and try to receive it through your email client. If the test email is successfully delivered, congratulations – you have successfully configured your Internet email settings for POP3!
By following these steps and paying attention to the details, you can ensure a seamless email experience with your POP3 account. If you encounter any issues during the configuration process, don’t hesitate to reach out to your email provider for assistance. With the right settings in place, you can enjoy the convenience of receiving emails directly to your local device through the POP3 protocol.
