How to Install PostgreSQL on Windows Server
PostgreSQL is a powerful, open-source relational database system that is widely used for storing and managing data. If you’re running a Windows Server environment and looking to install PostgreSQL for your data needs, you’re in the right place! In this step-by-step guide, we’ll walk you through the process of installing PostgreSQL on your Windows Server.
Prerequisites
Before we begin the installation process, there are a few prerequisites that you need to have in place:
- Windows Server: Make sure you have a Windows Server operating system installed on your machine.
- Administrator Access: You’ll need administrator access to install software on the server.
- Internet Connection: Ensure that your server is connected to the internet to download the PostgreSQL installer.
Step 1: Download the PostgreSQL Installer
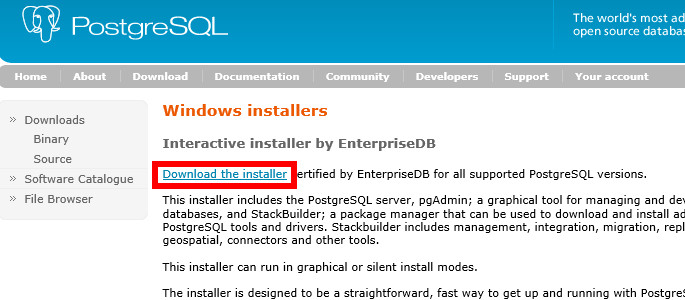
The first step is to download the PostgreSQL installer for Windows from the official PostgreSQL website. Go to https://www.postgresql.org/download/windows/ and download the latest version of PostgreSQL for Windows.
Step 2: Run the Installer
Once the download is complete, run the PostgreSQL installer. Follow the on-screen instructions to install PostgreSQL on your Windows Server. Make sure to choose the components you want to install, such as the database server, command-line tools, and other utilities.
Step 3: Configure PostgreSQL
After the installation is complete, you’ll need to configure PostgreSQL to ensure it works correctly on your Windows Server. During the installation process, you’ll be prompted to set a password for the default ‘postgres’ user. Make sure to remember this password as you’ll need it to access the PostgreSQL database.
Step 4: Start PostgreSQL Service
Once PostgreSQL is installed and configured, you’ll need to start the PostgreSQL service on your Windows Server. You can do this by going to the Services application in Windows, locating the PostgreSQL service, and starting it from there.
Step 5: Access PostgreSQL
Now that PostgreSQL is up and running on your Windows Server, you can access it using a tool like pgAdmin or psql. Use the ‘postgres’ username and the password you set during the installation process to log in to the PostgreSQL database.
Final Thoughts
Congratulations! You’ve successfully installed PostgreSQL on your Windows Server. PostgreSQL is a versatile and powerful database system that can handle a wide range of data storage needs. If you encounter any issues during the installation process, refer to the PostgreSQL documentation or seek help from the PostgreSQL community forums.
Thank you for following along with this guide on how to install PostgreSQL on Windows Server. We hope this information has been helpful to you in setting up PostgreSQL for your data management needs. Happy data storing!
