How to Take Database Backup in SQL Server 2012 Step by Step
Backing up your database is crucial in ensuring the security and integrity of your data. In SQL Server 2012, taking database backups is a relatively simple process that can be done in just a few steps. In this guide, we will walk you through the process of taking a database backup in SQL Server 2012, step by step.
Step 1: Launch SQL Server Management Studio
The first step in taking a database backup in SQL Server 2012 is to launch SQL Server Management Studio. This is the tool that allows you to interact with your SQL Server instance and perform various administrative tasks, including taking backups.
Step 2: Connect to the SQL Server Instance
Once you have launched SQL Server Management Studio, you will need to connect to the SQL Server instance where the database you want to back up is located. To do this, enter the server name, authentication method, and credentials and click “Connect.”
Step 3: Navigate to the Databases Section
After connecting to the SQL Server instance, navigate to the “Databases” section in the Object Explorer. Here, you will see a list of all the databases on the server.
Step 4: Right-click on the Database You Want to Back Up
In the Databases section, right-click on the database you want to back up. This will open a context menu with various options.
Step 5: Select “Tasks” and then “Backup”
From the context menu, hover over “Tasks” and then click on “Backup.” This will open the Backup Database window, where you can configure the backup options.
Step 6: Configure the Backup Options
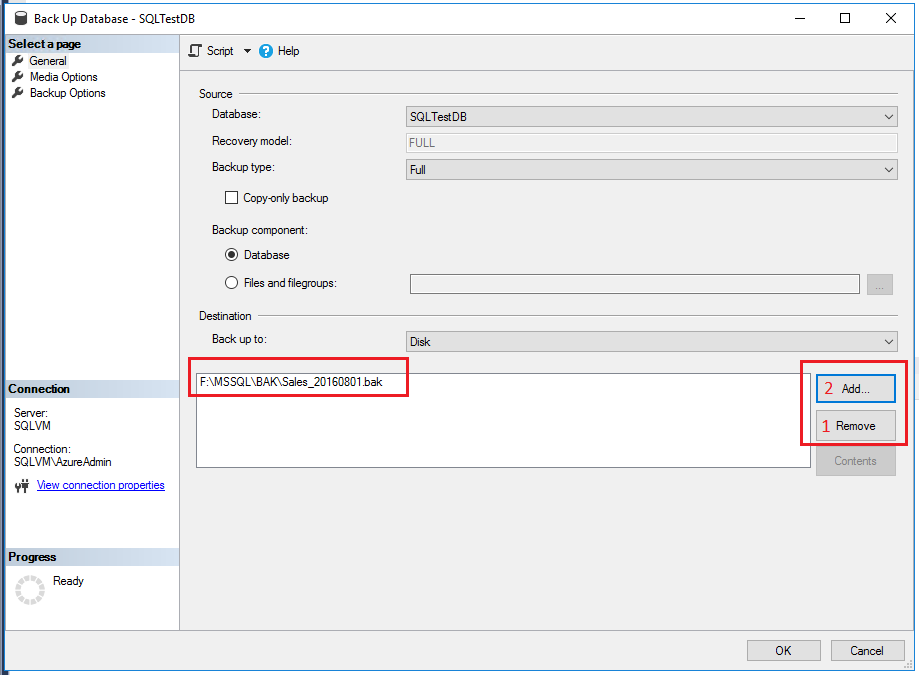
In the Backup Database window, you can configure various backup options, such as the backup type, destination, backup set name, and backup component. Make sure to review and adjust these options according to your requirements.
Step 7: Initiate the Backup Process
Once you have configured the backup options, click “OK” to initiate the backup process. SQL Server will then create a backup of the selected database based on the options you have specified.
Step 8: Verify the Backup
After the backup process is complete, you can verify the backup by checking the backup file location and ensuring that the backup file has been created successfully. It is also a good practice to test the backup by restoring it to a different location.
Conclusion
In conclusion, taking a database backup in SQL Server 2012 is a straightforward process that can be done in just a few steps. By following the steps outlined in this guide, you can ensure that your data is secure and protected in the event of a failure or data loss.
Remember to regularly back up your databases and test your backups to ensure that you can recover your data effectively when needed. By following best practices for database backups, you can minimize the risk of data loss and maintain the integrity of your data.
