How to Run Malware Scan on Windows 10
Viruses, malware, and other malicious software can wreak havoc on your Windows 10 computer, causing it to slow down, crash, or even compromise your personal information. Running regular malware scans is essential to keep your system safe and secure. In this guide, we will show you how to run a malware scan on Windows 10 using the built-in Windows Defender program. Follow these simple steps to protect your computer from harmful threats.
Step 1: Open Windows Defender Security Center
Windows Defender Security Center is the native security feature in Windows 10 that protects your computer from various threats, including malware. To open Windows Defender Security Center, follow these steps:
- Click on the Start button in the bottom left corner of your screen.
- Scroll through the list of applications and click on Windows Security.
- This will open the Windows Defender Security Center interface.
Step 2: Initiate a Full System Scan
Once you have opened Windows Defender Security Center, you can initiate a full system scan to check for malware and other malicious software. Follow these steps to run a full system scan:
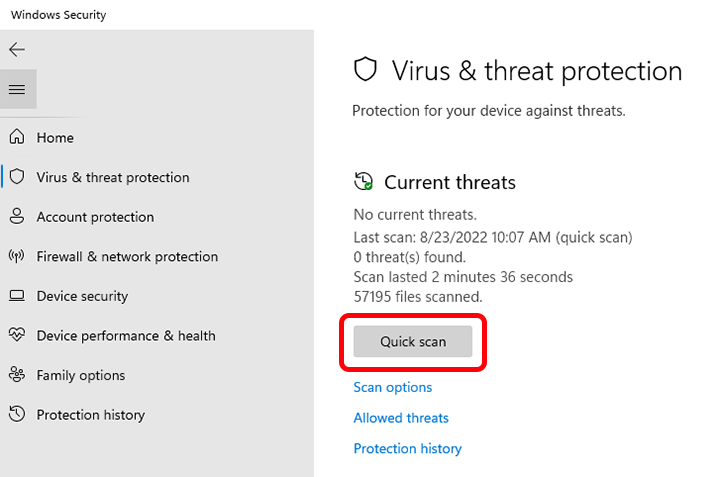
- Click on Virus & threat protection in the left-hand menu.
- Under the Quick scan section, click on Scan options.
- Select Full scan and then click on Scan now.
- Windows Defender will now scan your entire system for malware and other threats. This process may take some time depending on the size of your hard drive.
Step 3: Review Scan Results
Once the full system scan is complete, Windows Defender will display the scan results, including any detected malware or suspicious files. You can review the scan results and take action on any threats found. Follow these steps to review the scan results:
- Click on Protection history in the Windows Defender Security Center interface.
- Here, you will see a list of recent scans and their results.
- Click on a specific scan to view detailed information about the detected threats.
- You can then choose to Quarantine or Remove any malicious files found during the scan.
Step 4: Schedule Regular Scans
To ensure your computer is always protected from malware, it is recommended to schedule regular scans using Windows Defender Security Center. Follow these steps to schedule a scan:
- Click on Virus & threat protection in the left-hand menu of Windows Defender Security Center.
- Under the Current threats section, click on Scan options.
- Click on Run a new advanced scan and select the type of scan you want to schedule.
- Choose the Schedule a scan option and set the frequency and time for the scan.
- Click on Save to schedule the scan.
By following these simple steps, you can run a malware scan on your Windows 10 computer to keep it safe and secure from harmful threats. Remember to regularly update your antivirus software and practice safe browsing habits to further protect your system.
