How to Make a Database in phpMyAdmin
Creating a database in phpMyAdmin is a fundamental task for anyone working with web development or data management. Whether you are a beginner or an experienced developer, having a clear understanding of how to set up a database in phpMyAdmin is essential. In this guide, we will walk you through the process step by step.
Step 1: Accessing phpMyAdmin
The first step in creating a database is accessing phpMyAdmin. You can do this by logging into your web hosting control panel and locating the phpMyAdmin icon. Click on the icon to launch phpMyAdmin.
Step 2: Creating a New Database
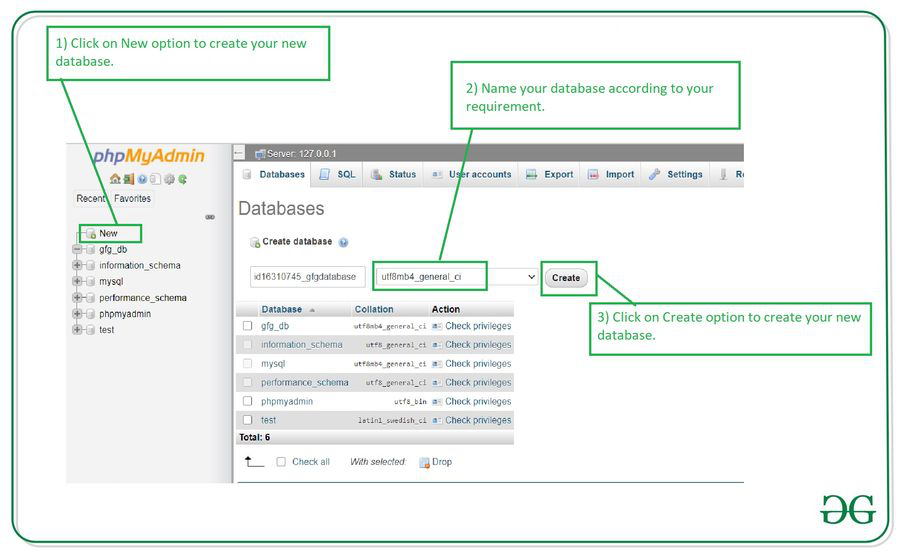
Once you have accessed phpMyAdmin, you will need to create a new database. Look for the “Create Database” option, usually located on the left-hand sidebar. Enter a name for your new database and select the appropriate collation.
It is important to choose a meaningful name for your database that reflects the purpose of the data you will be storing. The collation determines the character set and sorting rules for the database, so choose one that is appropriate for your project.
Step 3: Creating Tables
Once you have created a new database, the next step is to create tables within that database. Tables are used to organize data into rows and columns. Click on the database name you just created and then select the “Create Table” option.
When creating a table, you will need to define the columns that will hold your data. Each column should have a unique name, data type, length, and other attributes. You can also set a primary key for the table to ensure each row is uniquely identified.
Step 4: Adding Data
With your database and tables set up, you can now start adding data. Click on the table name you created and select the “Insert” option. Enter the data for each column and click “Go” to save the data to the table.
It is important to ensure that the data you are adding is accurate and consistent. Data integrity is crucial for the reliability of your database and the applications that rely on it.
Step 5: Managing Your Database
Once you have created a database and added data to it, you may need to perform various management tasks. phpMyAdmin offers a range of features for managing databases, including importing and exporting data, optimizing tables, and running SQL queries.
It is important to regularly maintain your database to ensure optimal performance and data security. Be sure to back up your database regularly to prevent data loss in the event of a hardware failure or other issue.
Conclusion
Creating a database in phpMyAdmin is a straightforward process that is essential for web developers and data managers. By following the steps outlined in this guide, you can create a database, set up tables, add data, and manage your database effectively. Remember to regularly maintain your database to ensure its reliability and security.
