How to Import MySQL Database in cPanel
Importing a MySQL database in cPanel is a crucial task for website owners who need to transfer data from one server to another or simply backup their database. Follow this step-by-step guide to learn how to effortlessly import your MySQL database in cPanel.
Step 1: Access cPanel
First, login to your cPanel account. You can do this by navigating to your hosting provider’s website and entering your username and password. Once logged in, search for the MySQL Databases icon and click on it to proceed.
Step 2: Locate MySQL Database Import Tool
Next, locate the phpMyAdmin tool within cPanel. You can usually find this under the Databases section. Click on phpMyAdmin to access the database management interface.
Step 3: Choose Database to Import
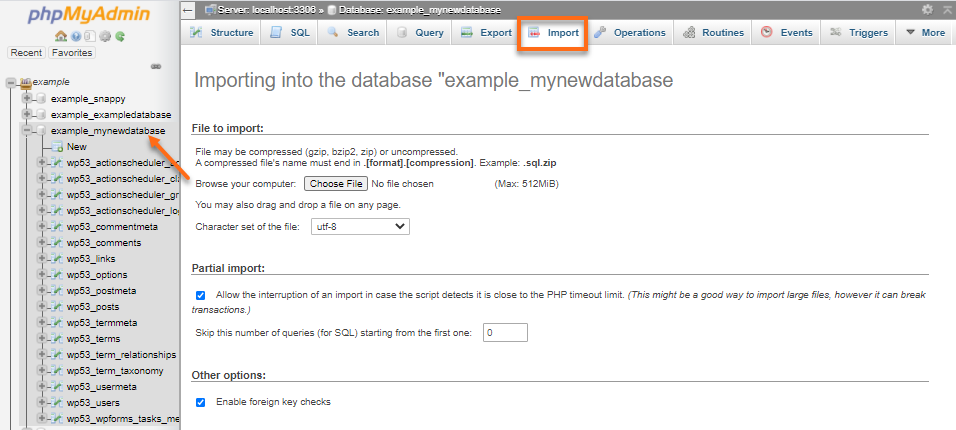
Once inside phpMyAdmin, select the database you wish to import on the left-hand side. This will display a list of tables within the database.
Step 4: Import Database File
To import the database file, click on the Import tab at the top of the page. Choose the file you want to import by clicking on the Browse button and selecting the file from your computer. Make sure the format is SQL.
Step 5: Confirm Import Settings
Before importing, make sure the character set is set to utf8 or utf8mb4, depending on your database. You can also choose to automatically adjust the file size upload limit if needed. Once you have confirmed the settings, click Go to begin the import process.
Step 6: Verify Import Success
After the import process is complete, phpMyAdmin will display a success message. You can now verify that the data has been imported correctly by browsing through the tables in the database.
Conclusion
Importing a MySQL database in cPanel is a straightforward process that is essential for website owners. By following these simple steps, you can easily import your database and ensure that your data is safe and secure.
