How to Export Contact Group from Outlook to CSV
Exporting your contact group from Outlook to a CSV file can be a useful way to organize and manage your contacts. Whether you want to back up your contacts, share them with someone else, or simply keep a record of them in a different format, exporting to CSV is a great option. In this article, we will guide you through the process of exporting your contact group from Outlook to CSV in a few simple steps.
Step 1: Open Outlook and Navigate to Contacts
The first step in exporting your contact group is to open Outlook on your computer. Once you have opened Outlook, navigate to the Contacts section. You can do this by clicking on the “Contacts” tab in the bottom left corner of the Outlook window.
Step 2: Select the Contact Group You Want to Export
Once you have accessed your contacts in Outlook, you will need to select the contact group that you want to export to a CSV file. To do this, locate the contact group in your contacts list and click on it to select it.
Step 3: Click on “File” and Select “Open & Export”
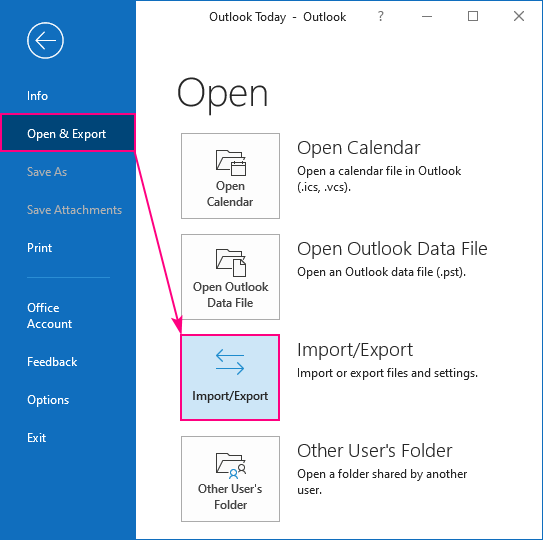
After selecting the contact group you want to export, click on the “File” tab in the top left corner of the Outlook window. From the dropdown menu that appears, select “Open & Export” to continue the export process.
Step 4: Choose “Import/Export” Option
Once you have selected “Open & Export”, another dropdown menu will appear. From this menu, choose the “Import/Export” option to begin the process of exporting your contact group to a CSV file.
Step 5: Select “Export to a File” and Click “Next”
After choosing the “Import/Export” option, you will be presented with a wizard that guides you through the export process. Select the “Export to a file” option and click “Next” to proceed.
Step 6: Choose “Comma Separated Values” and Click “Next”
On the next screen, you will be prompted to choose the type of file you want to export to. Select “Comma Separated Values” (CSV) and click “Next” to move on to the next step.
Step 7: Select the Contact Group and Choose a Location to Save the CSV File
After selecting the file type, you will need to choose the contact group that you want to export to CSV. Once you have selected the contact group, choose a location on your computer where you want to save the CSV file and click “Next” to continue.
Step 8: Complete the Export Process
On the final screen of the export wizard, review the settings to ensure they are correct. If everything looks good, click “Finish” to complete the export process. Outlook will export your contact group to a CSV file and save it to the location you specified.
Conclusion
Exporting your contact group from Outlook to a CSV file is a simple and effective way to manage and share your contacts. By following the steps outlined in this article, you can easily export your contact group and have a CSV file that can be accessed and shared with others. Take advantage of this feature in Outlook to stay organized and efficient with your contacts.
