How to Create a Database Using phpMyAdmin
Welcome to our step-by-step guide on how to create a database using phpMyAdmin. Whether you’re a beginner or an experienced developer, phpMyAdmin is a powerful tool that makes database management easy and efficient. Let’s dive right in!
Step 1: Accessing phpMyAdmin
The first step to creating a database using phpMyAdmin is accessing the tool itself. To do this, you’ll need to log in to your web hosting control panel and locate the phpMyAdmin icon. Click on the icon to launch phpMyAdmin in your web browser.
Step 2: Creating a New Database
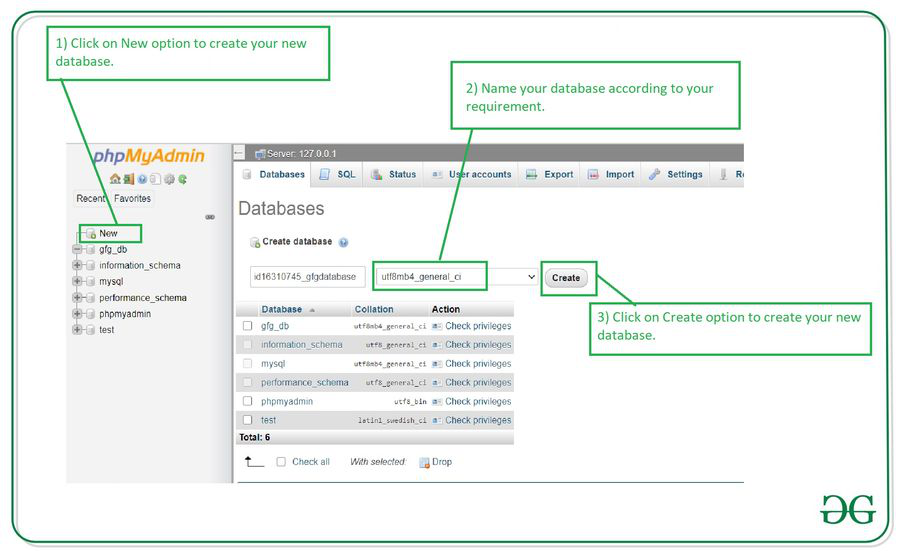
Once you’re in phpMyAdmin, you’ll see a menu on the left-hand side of the screen. Click on the “Databases” tab to display a list of existing databases. To create a new database, simply enter the name of your database in the designated field and click on the “Create” button.
Step 3: Adding Tables to Your Database
With your database created, the next step is to add tables to it. Click on the name of your newly created database in the left-hand menu, then click on the “Structure” tab. From here, you can define the structure of your tables by adding columns, specifying data types, and setting primary keys.
Step 4: Importing Data into Your Database
If you have existing data that you’d like to import into your database, phpMyAdmin makes it easy to do so. Click on the “Import” tab, choose your file, and follow the on-screen instructions to import your data into the database.
Step 5: Managing Your Database
Once your database is set up and populated with data, you can use phpMyAdmin to manage it effectively. You can run SQL queries, modify table structures, delete data, and perform various other tasks to keep your database running smoothly.
Conclusion
Creating a database using phpMyAdmin is a simple and straightforward process that anyone can master with a little practice. By following the steps outlined in this guide, you’ll be able to create and manage databases like a pro in no time. Happy coding!
