How to Add SSH Key to Hetzner Cloud
Adding an SSH key to your Hetzner Cloud server is a critical step in ensuring secure access to your server. This guide will walk you through the process of adding an SSH key to your Hetzner Cloud account.
Step 1: Generate SSH Key Pair
The first step in adding an SSH key to your Hetzner Cloud account is to generate an SSH key pair on your local machine. To do this, open your terminal and run the following command:
ssh-keygen -t rsa -b 4096
Follow the on-screen instructions to generate your SSH key pair. Make sure to secure your private key and keep it safe.
Step 2: Log in to Hetzner Cloud Console
Next, log in to your Hetzner Cloud console using your credentials. Once logged in, navigate to the Security section in the left-hand menu.
Step 3: Add SSH Key
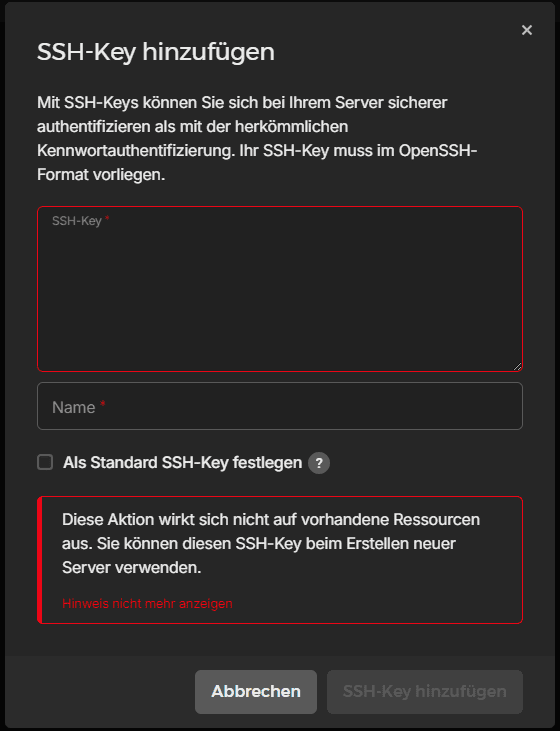
In the SSH Keys section, click on the Add SSH Key button. Copy the contents of your public key (usually found in ~/.ssh/id_rsa.pub) and paste it into the designated field.
Give your SSH key a name for easy identification. Once you have entered all the required details, click on the Add SSH Key button to save your SSH key to your Hetzner Cloud account.
Step 4: SSH into Your Server
Now that you have added your SSH key to your Hetzner Cloud account, you can securely SSH into your server using the following command:
ssh -i ~/.ssh/id_rsa root@your_server_ip
Replace your_server_ip with the IP address of your Hetzner Cloud server. You should now be able to access your server securely without having to enter a password.
Conclusion
Adding an SSH key to your Hetzner Cloud account is a simple yet essential step in securing your server access. By following the steps outlined in this guide, you can easily add an SSH key and enhance the security of your Hetzner Cloud server.
