How to Enable Remote Desktop on Windows Server 2016
Remote Desktop is a feature in Windows Server 2016 that allows you to remotely access and control your server from another computer. Enabling Remote Desktop on your Windows Server 2016 can provide you with more flexibility and convenience in managing your server, especially when you need to access it from a remote location.
In this article, we will guide you through the steps to enable Remote Desktop on your Windows Server 2016 so you can start utilizing this powerful feature. Let’s get started!
Step 1: Accessing Server Manager
The first step is to open Server Manager on your Windows Server 2016. You can do this by clicking on the Windows icon in the bottom left corner of your screen and typing “Server Manager” in the search bar. Click on the Server Manager app to open it.
Step 2: Configuring Remote Desktop Settings
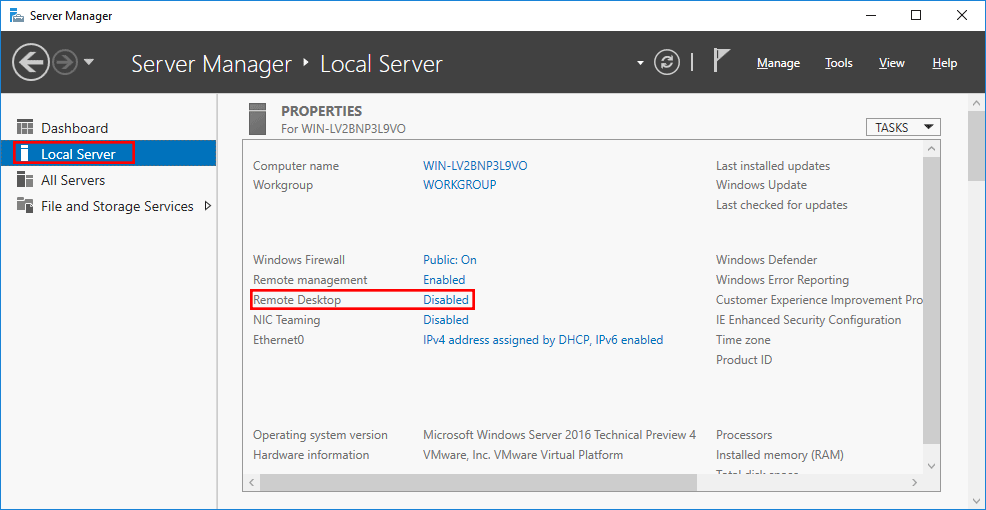
Once Server Manager is open, navigate to the “Local Server” tab on the left-hand side. In the Properties section, you will see an option for “Remote Desktop.” Click on the disabled status next to Remote Desktop to open the Remote Desktop settings.
Here, you will see a message saying “Remote Desktop is currently disabled.” To enable Remote Desktop, click on the “Disabled” link. This will open the System Properties window.
In the System Properties window, go to the “Remote” tab. Here, you will see an option to enable Remote Desktop. Check the box next to “Allow remote connections to this computer” and click on “Apply” to save the changes.
You may also need to configure the firewall settings to allow Remote Desktop connections. To do this, go to Control Panel > System and Security > Windows Defender Firewall. Click on “Allow an app or feature through Windows Firewall” and make sure that “Remote Desktop” is checked.
Step 3: Connecting to Remote Desktop
With Remote Desktop enabled on your Windows Server 2016, you can now connect to it from another computer. To do this, open the Remote Desktop app on your computer and enter the IP address or hostname of your server. Click on “Connect,” and you will be prompted to enter your username and password to access the server.
Once you have successfully connected to your Windows Server 2016 via Remote Desktop, you will be able to manage your server as if you were sitting in front of it. This can be incredibly useful for system administrators who need to access their servers remotely.
Enabling Remote Desktop on your Windows Server 2016 is a straightforward process that can provide you with more flexibility and convenience in managing your server. By following the steps outlined in this article, you can start utilizing Remote Desktop to its full potential.
We hope this guide has been helpful in enabling Remote Desktop on your Windows Server 2016. If you have any questions or need further assistance, feel free to reach out to us. Happy remote desktopping!
