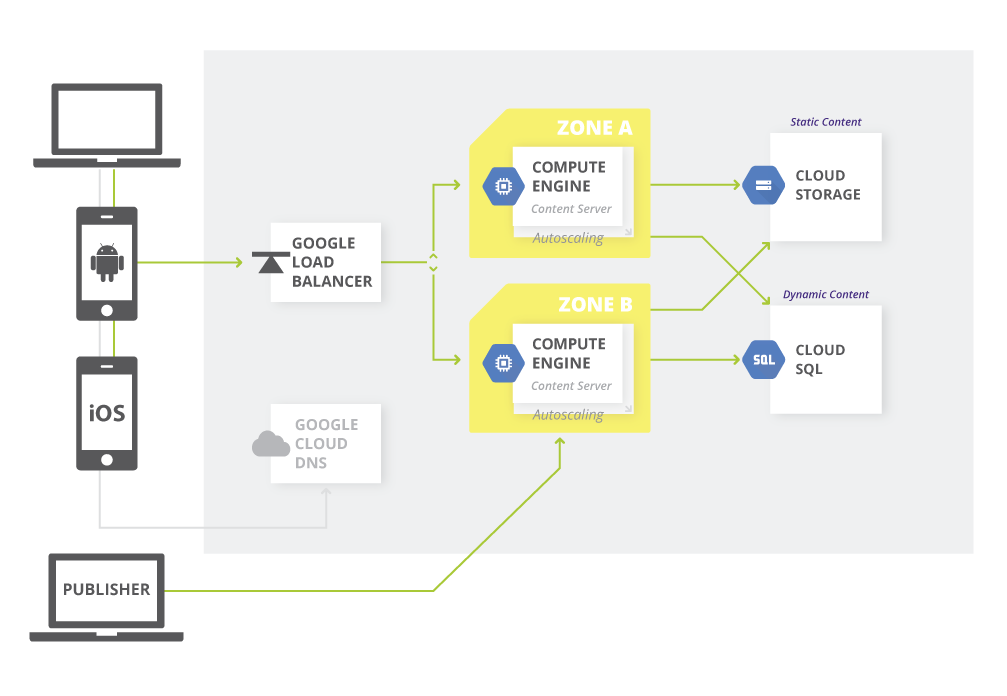
Setting Up a Google Cloud Web Server
Setting up a web server on Google Cloud can seem like a daunting task, but with the right guidance, it can be a straightforward process. In this article, we will walk you through the steps to set up a web server on Google Cloud, allowing you to host your website and applications with ease.
Step 1: Create a Google Cloud Account
The first step to setting up a web server on Google Cloud is to create an account. If you don’t already have one, head over to the Google Cloud website and sign up for an account. Once you have your account set up, you can move on to the next step.
Step 2: Create a Project
Once you have your Google Cloud account set up, the next step is to create a project. Projects on Google Cloud are used to manage resources and permissions, making it easier to organize your web server setup. To create a project, simply navigate to the Cloud Console and click on “Create Project.” Give your project a name and click “Create” to proceed.
Step 3: Set Up a Virtual Machine Instance
With your project created, it’s time to set up a virtual machine instance to act as your web server. To do this, navigate to the Compute Engine section of the Cloud Console and click on “Create Instance.” Choose the appropriate settings for your virtual machine, including machine type, boot disk, and networking options. Once you have configured your instance, click “Create” to deploy it.
Step 4: Configure Firewall Rules
To ensure that your web server is accessible from the internet, you will need to configure firewall rules on Google Cloud. Navigate to the VPC Network section of the Cloud Console and click on “Firewall Rules.” Create a new firewall rule to allow traffic on port 80 (HTTP) and port 443 (HTTPS) to your virtual machine instance.
Step 5: Install Web Server Software
With your virtual machine instance up and running, it’s time to install web server software to host your website. Depending on your preferences, you can choose from popular options like Apache, Nginx, or Lighttpd. Follow the installation instructions for your chosen web server software to complete this step.
Step 6: Upload Your Website Files
Once your web server software is installed, you can upload your website files to the virtual machine instance. Use secure file transfer protocols like SCP or SFTP to transfer your files to the server. Make sure to place your website files in the appropriate directory to ensure they are accessible to visitors.
Step 7: Test Your Web Server
With everything set up, it’s time to test your web server to ensure that it is working correctly. Open a web browser and enter the IP address of your virtual machine instance. If everything was set up correctly, you should see your website displayed in the browser. Congratulations, you have successfully set up a web server on Google Cloud!
Conclusion
Setting up a web server on Google Cloud may seem intimidating at first, but with the right steps and guidance, it can be a smooth and rewarding experience. By following the steps outlined in this article, you will be able to host your website and applications on Google Cloud with ease. So, why wait? Get started today and unleash the power of the cloud!
