How to Create a Table in phpMyAdmin Using SQL Code
Creating a table in phpMyAdmin using SQL code is a fundamental skill that every developer should have in their toolkit. Whether you’re a beginner just getting started with databases or an experienced pro looking to refresh your skills, this guide will walk you through the process step by step.
Before we dive into the specific SQL code you’ll need to create a table, let’s first make sure you’re familiar with phpMyAdmin. phpMyAdmin is a free tool that allows you to manage your MySQL databases through a web-based interface. If you don’t already have it installed, you can download it from the official website and follow the installation instructions.
Once you have phpMyAdmin up and running, follow these steps to create a table using SQL code:
Step 1: Access phpMyAdmin
Open your web browser and enter the URL for your phpMyAdmin installation. You’ll be prompted to log in with your MySQL username and password. Once logged in, you’ll see a list of databases on the left-hand side of the screen.
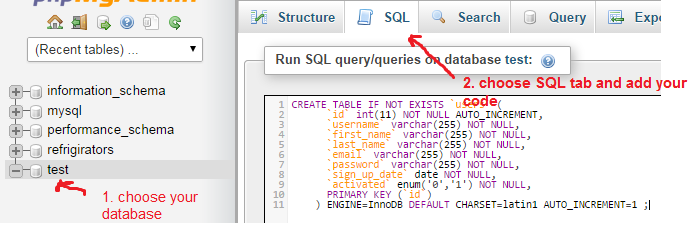
Step 2: Select a Database
Click on the database where you want to create the table. This will open up a new tab with a list of tables in that database.
Step 3: Click on the SQL Tab
At the top of the screen, you’ll see a row of tabs. Click on the one labeled “SQL” to open up the SQL query window.
Step 4: Write Your SQL Code
Now it’s time to write the SQL code that will create your table. Here’s an example of what your code might look like:
CREATE TABLE customers (
    id INT AUTO_INCREMENT PRIMARY KEY,
    name VARCHAR(50) NOT NULL,
    email VARCHAR(100) NOT NULL,
    created_at TIMESTAMP DEFAULT CURRENT_TIMESTAMP
);
This code creates a table named “customers” with four columns: an ID column that auto-increments and serves as the primary key, a name column that stores up to 50 characters and cannot be null, an email column that stores up to 100 characters and cannot be null, and a created_at column that defaults to the current timestamp.
Step 5: Execute Your Query
Once you’ve written your SQL code, click on the “Go” button to execute the query. If there are no errors in your code, phpMyAdmin will create the table for you. You should see a success message confirming that the query was executed successfully.
Step 6: Verify Your Table
To make sure your table was created correctly, click on the database name in the left-hand column and then click on the “Refresh” button. You should see your new table listed among the others in the database.
And that’s it! You’ve successfully created a table in phpMyAdmin using SQL code. Remember, creating tables is just one of the many things you can do with SQL. The more you practice and experiment, the more comfortable you’ll become with writing and executing SQL queries. Happy coding!