Create a Database in phpMyAdmin
Creating a database in phpMyAdmin is an essential step when building a website or a web application. With phpMyAdmin, an intuitive and user-friendly web interface for managing MySQL databases, you can easily create databases to store and organize your website’s data.
Follow the step-by-step guide below to create a database in phpMyAdmin:
Step 1: Access phpMyAdmin
First, log in to your hosting account where phpMyAdmin is installed. You can access phpMyAdmin through your web hosting control panel, usually found under the databases section.
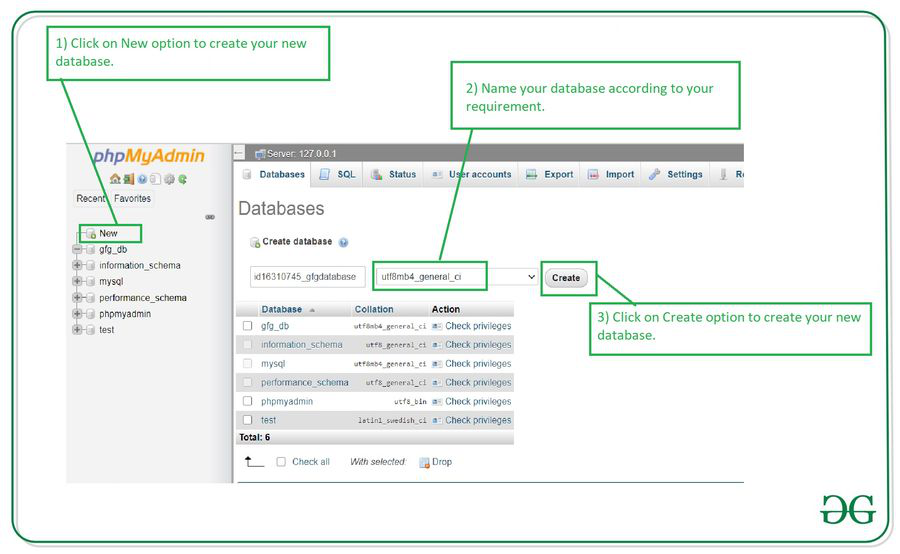
Step 2: Navigate to the Databases Tab
Once you are logged in to phpMyAdmin, you will see a list of databases on the left-hand side of the screen. Click on the “Databases” tab to proceed.
Step 3: Create a New Database
Click on the “Create Database” button, and a pop-up window will appear. Enter a name for your new database in the “Database name” field. Make sure to choose a unique and descriptive name for your database.
After entering the database name, click the “Create” button to create the database. You will see a confirmation message indicating that the database has been successfully created.
Step 4: Set Privileges
Once the database is created, you will need to set privileges for the database user. Click on the “Privileges” tab, then click on “Add User Account.”
Enter the username and password for the new user, and make sure to select the newly created database from the list of databases available. Set the privileges for the user based on your specific requirements.
Click the “Go” button to save the changes. Your new database is now ready to use!
Final Thoughts
Creating a database in phpMyAdmin is a simple and straightforward process that is essential for managing your website’s data effectively. By following the steps outlined above, you can create a new database and set privileges for users in no time.