Azure Load Balancer Step by Step
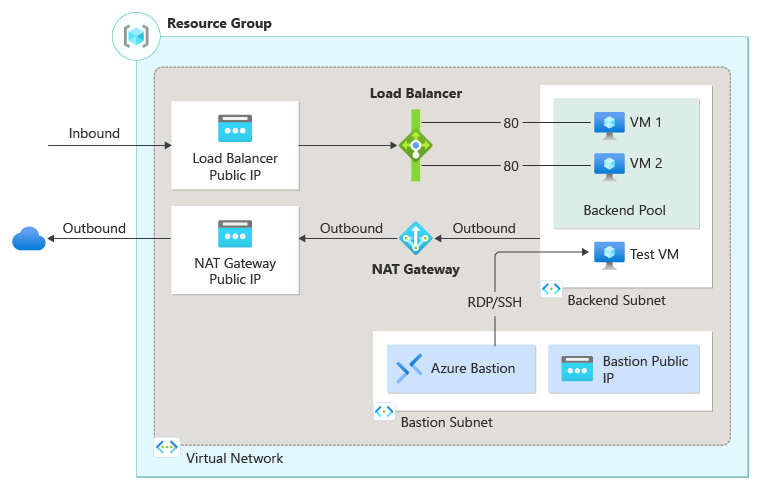
Are you looking to learn about Azure Load Balancer? Look no further! In this article, we will guide you through the process of setting up an Azure load balancer step by step. Whether you are a beginner or an experienced user, this guide is designed to help you understand and implement Azure Load Balancer in your cloud environment. So, let’s get started!
What is an Azure Load Balancer?
Before we dive into the details, let’s first understand what an Azure Load Balancer is. An Azure Load Balancer is a networking service that distributes incoming network traffic across multiple servers or instances to ensure high availability and reliability of applications running in the cloud. It helps in optimizing resource utilization, minimizing downtime, and improving the performance of your applications.
Setting up an Azure Load Balancer
Now, let’s walk through the steps to set up an Azure Load Balancer:
Step 1: Sign in to the Azure Portal
The first step is to log in to the Azure Portal using your credentials. If you don’t have an Azure account, you can sign up for a free trial to get started.
Step 2: Create a Resource Group
Next, create a new resource group in which you will deploy your Azure Load Balancer. This resource group acts as a container for all the resources related to your load balancer.
Step 3: Create a Virtual Network
Now, create a virtual network that will be used by the Azure Load Balancer to distribute incoming traffic. Make sure to configure the subnets and IP address ranges accordingly.
Step 4: Create a Public IP Address
Next, create a public IP address that will be associated with the Azure Load Balancer. This IP address will be used by clients to access your applications or services.
Step 5: Configure the Load Balancer
Now, it’s time to configure the Azure Load Balancer. You will need to define the frontend IP configuration, backend pool, health probe, load balancing rules, and other settings based on your requirements.
Step 6: Verify the Configuration
Before you deploy the Azure Load Balancer, make sure to review and verify the configuration settings to avoid any errors or issues. Double-check the IP addresses, rules, and probes to ensure everything is set up correctly.
Conclusion
Congratulations! You have successfully set up an Azure Load Balancer by following these step-by-step instructions. Now you can enjoy the benefits of load balancing in your Azure environment and ensure high availability and scalability for your applications. If you have any questions or need further assistance, feel free to reach out to the Azure support team. Happy load balancing!
