How to Set up Zimbra Email on Outlook
Setting up your Zimbra email on Outlook is a great way to streamline your email management. By using Outlook, you can easily access all your emails in one place, making it convenient for you to stay organized and up-to-date on your communications. In this guide, we will walk you through the steps to set up your Zimbra email on Outlook seamlessly.
Step 1: Gather Your Zimbra Email Settings
Before you begin the setup process, make sure you have your Zimbra email settings handy. You will need information such as your email address, username, password, incoming mail server, and outgoing mail server. You can typically find this information in your Zimbra account settings or by contacting your IT administrator.
Step 2: Open Outlook and Go to File
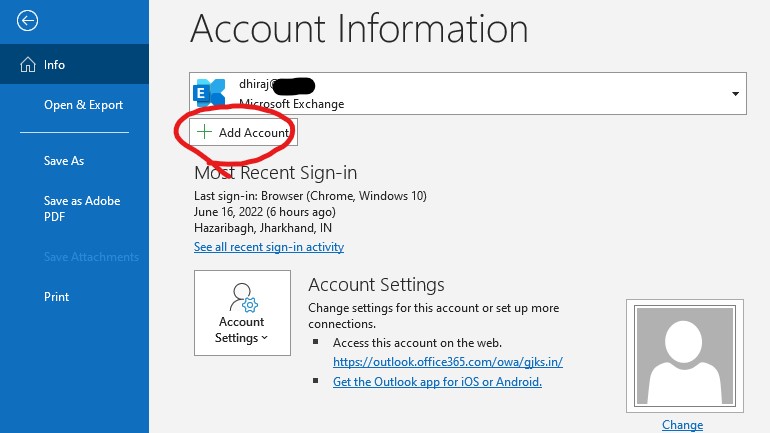
Launch Outlook on your computer and navigate to the “File” tab in the top left corner of the screen. Click on “Add Account” to begin the setup process.
Step 3: Choose Manual Setup
On the next screen, select “Manual setup or additional server types” and click “Next” to proceed.
Step 4: Select POP or IMAP
Choose “POP or IMAP” as the account type and click “Next” to continue.
Step 5: Enter Your User Information
Now, it’s time to enter your user information. Fill out your name, email address, account type (POP3 or IMAP), incoming mail server (usually mail.yourdomain.com), outgoing mail server (usually mail.yourdomain.com), username, and password. Click “More Settings” once you’ve entered this information.
Step 6: Configure Outgoing Server Settings
In the “Outgoing Server” tab, check the box that says “My outgoing server (SMTP) requires authentication” and select “Use same settings as my incoming mail server.” Go to the “Advanced” tab and enter the correct port numbers for your incoming and outgoing servers (usually 110 for POP3 or 143 for IMAP, and 25 for SMTP). Click “OK” to save your settings.
Step 7: Test Your Settings
Before finishing the setup, click on “Test Account Settings” to ensure that everything is configured correctly. If everything checks out, click “Next” and then “Finish” to complete the setup process.
Step 8: Start Using Zimbra Email on Outlook
Once you have successfully set up your Zimbra email on Outlook, you can start using your account right away. Your emails will now sync automatically, and you can enjoy the benefits of managing your emails in one place.
Setting up your Zimbra email on Outlook is a simple process that can greatly improve your email management experience. By following the steps outlined in this guide, you can seamlessly integrate your Zimbra account with Outlook and enjoy the convenience of accessing all your emails in one place.
