How to Backup Database in SQL Server 2019
If you are working with SQL Server 2019, you know how important it is to regularly backup your databases to prevent data loss in case of any unforeseen circumstances. In this article, we will guide you through the process of backing up your database in SQL Server 2019.
Step 1: Launch SQL Server Management Studio
The first step is to launch SQL Server Management Studio. This is the primary tool that you will use to interact with your databases in SQL Server 2019.
Once you have launched SQL Server Management Studio, connect to the server where your database is located. You will need to provide your credentials to access the server.
Step 2: Select the Database to Backup
After connecting to the server, you will see a list of databases on the left side of the screen. Select the database that you want to back up by clicking on it.
Make sure to choose the correct database as backing up the wrong database can result in data loss.
Step 3: Right-click on the Database
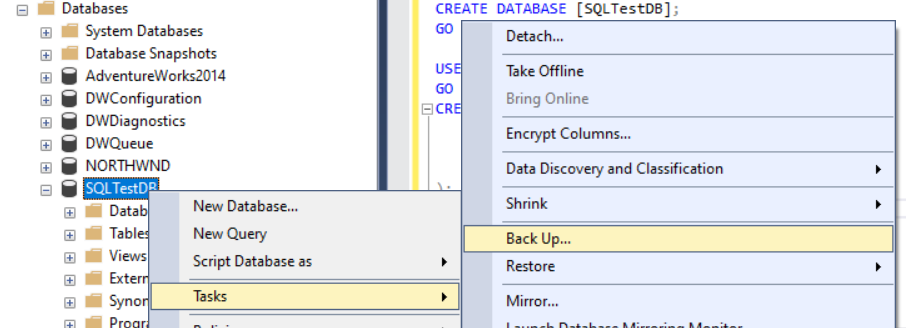
Once you have selected the database, right-click on it. This will open a context menu with various options.
From the context menu, select “Tasks” and then click on “Backup”. This will open the Backup Database dialog box.
Step 4: Configure Backup Settings
In the Backup Database dialog box, you can configure various settings related to the backup.
Specify a name for the backup in the “Backup set” text box. You can also choose the backup type, compression options, and backup destination.
Make sure to review the settings carefully to ensure that the backup is created successfully.
Step 5: Perform the Backup
After configuring the backup settings, click on the “OK” button to start the backup process. SQL Server will create a backup of the selected database according to the settings you specified.
Once the backup is complete, you will see a message confirming the successful creation of the backup file.
Step 6: Verify the Backup
After the backup process is complete, it is essential to verify that the backup file has been created successfully.
You can do this by navigating to the backup destination and checking for the presence of the backup file. You should also test the backup file to ensure that it contains the data you need.
Conclusion
Backing up your databases in SQL Server 2019 is a critical task that should not be overlooked. By following the steps outlined in this article, you can ensure that your data is safe and secure in case of any unexpected events.
Remember to regularly backup your databases and store the backup files in a secure location to prevent any potential data loss. Stay proactive and protect your valuable data with regular backups!
