How to Export Contacts from Outlook to CSV
Do you need to export your contacts from Outlook to a CSV file? Whether you’re switching to a new email client or simply want to backup your contacts, exporting them to a CSV file is a quick and easy process. In this article, we’ll walk you through the steps to export your contacts from Outlook to a CSV file.
Step 1: Open Outlook and Select Your Contacts
First, open Outlook on your computer and navigate to the Contacts section. Here, you’ll find all of your contacts listed. Select the contacts that you want to export by clicking on them while holding down the Ctrl key to select multiple contacts.
Step 2: Click on “File” and Select “Open & Export”
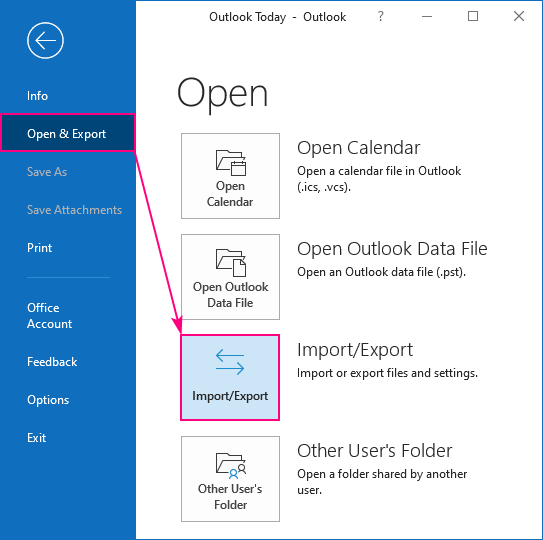
Once you have selected the contacts you want to export, click on the “File” tab at the top of the Outlook window. From the drop-down menu, select “Open & Export” to access the export options.
Step 3: Choose “Import/Export”
In the Open & Export menu, select the “Import/Export” option. This will open the Import and Export Wizard, which will guide you through the process of exporting your contacts to a CSV file.
Step 4: Select “Export to a File” and Click “Next”
In the Import and Export Wizard, choose the “Export to a file” option and click “Next” to proceed to the next step.
Step 5: Choose “Comma Separated Values” and Click “Next”
On the next screen, select “Comma Separated Values” as the file type to export and click “Next” to continue.
Step 6: Select the Contacts Folder to Export
From the list of folders, choose the Contacts folder where your selected contacts are stored. You can also choose to export all of your contacts by selecting the main Contacts folder.
Step 7: Choose a Destination for the Exported File and Name It
Next, select a destination on your computer where you want to save the CSV file. You can also give the file a name to easily identify it later.
Step 8: Complete the Export Process
Review the settings to ensure everything is correct, then click “Finish” to complete the export process. Outlook will export the selected contacts to a CSV file at the location you specified.
Step 9: Verify the Exported CSV File
Once the export process is complete, navigate to the location where you saved the CSV file. Open the file in a spreadsheet program like Microsoft Excel to verify that your contacts have been successfully exported.
Conclusion
Exporting contacts from Outlook to a CSV file is a simple process that allows you to backup or transfer your contacts easily. By following the steps outlined in this article, you can ensure that your contacts are safely exported to a CSV file for future use.
