How to Set Up an SSH Tunnel
If you want to enhance the security of your internet connection and protect your data while browsing, setting up an SSH tunnel is a great way to achieve this. SSH tunneling is a method of securely transmitting data between two devices by encrypting the connection. In this article, we will guide you through the steps to set up an SSH tunnel on your device.
Step 1: Install SSH Client
The first step in setting up an SSH tunnel is to ensure that you have an SSH client installed on your device. Most operating systems come with a built-in SSH client, but you can also download third-party clients for more advanced features. Popular SSH clients include OpenSSH, PuTTY, and SecureCRT.
Step 2: Connect to SSH Server
Next, you will need to connect to an SSH server. You can do this by opening your SSH client and entering the server’s hostname or IP address, along with your username and password. Once you have successfully connected to the server, you can proceed to set up the SSH tunnel.
Step 3: Set Up the Tunnel
To set up an SSH tunnel, you will need to open a terminal window on your device and enter the following command:
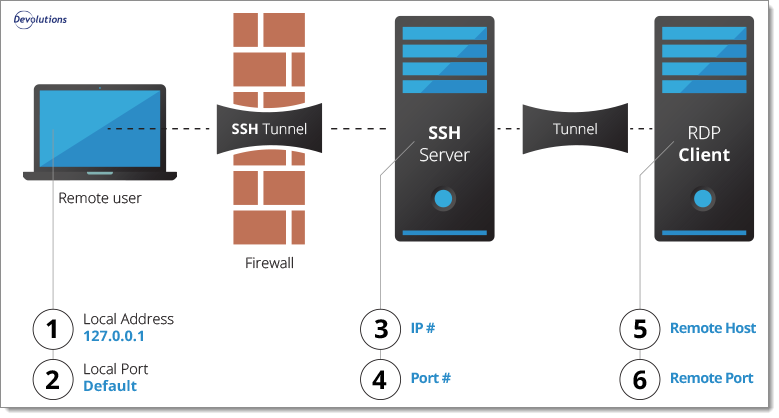
ssh -L [local port]:[destination host]:[destination port] [username]@[server]
Replace [local port] with the port on your device that you want to use for the tunnel, [destination host] with the hostname or IP address of the server you want to connect to, [destination port] with the port on the server, [username] with your username, and [server] with the server’s hostname or IP address.
Step 4: Configure Your Application
Once the tunnel is set up, you will need to configure your application to use the tunnel for its internet connection. This can usually be done in the application’s settings or preferences menu. Enter the local port that you specified in the SSH command as the proxy port, and you should now be connected to the internet through the SSH tunnel.
Step 5: Enjoy Secure Browsing
With your SSH tunnel setup, you can now enjoy a secure and encrypted internet connection. Your data will be protected from prying eyes, and you can browse the web with peace of mind knowing that your information is safe. Remember to disconnect from the SSH server when you are finished using the tunnel to ensure the security of your connection.
Setting up an SSH tunnel may seem complicated at first, but with the right guidance, it can be a valuable tool for protecting your data online. Follow these steps carefully, and you will be able to enjoy a more secure browsing experience.
