How to Install Kubernetes: A Comprehensive Guide
If you’re looking to deploy and manage containerized applications at scale, Kubernetes is the go-to solution. Kubernetes is an open-source container orchestration platform that enables you to automate the deployment, scaling, and operations of application containers. In this guide, we’ll walk you through the process of installing Kubernetes on your system.
Step 1: Check Prerequisites
Before you begin the installation process, it’s essential to ensure that your system meets the following prerequisites:
- A Linux-based OS (such as Ubuntu, CentOS, or Debian)
- At least 2GB of RAM per machine
- A 2-core CPU or more
- Full network connectivity between all machines in the cluster
Step 2: Install Docker
Kubernetes relies on containerization for application deployment. Therefore, the first step is to install Docker on all machines that will be part of the Kubernetes cluster. You can refer to the official Docker installation guide for your specific OS.
Step 3: Install kubeadm, kubectl, and kubelet
Next, you’ll need to install the Kubernetes tools – kubeadm, kubectl, and kubelet – on your system. Here’s how you can install them:
- Install kubeadm:
sudo apt-get update && sudo apt-get install -y kubelet kubeadm kubectl
For non-Debian based distributions, please refer to the official Kubernetes documentation for installation instructions.
Step 4: Initialize the Cluster
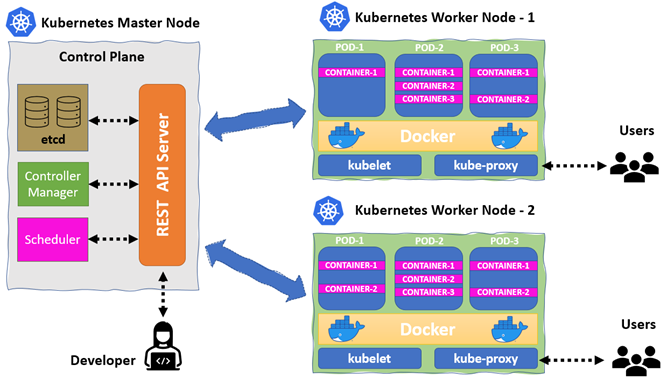
Once you have Docker and the necessary Kubernetes tools installed, you can initialize the Kubernetes cluster using the kubeadm tool. Run the following command on the master node:
kubeadm init
This command will set up a new Kubernetes control-plane instance with all the necessary configurations.
Step 5: Join Nodes to the Cluster
After initializing the master node, you’ll need to join the worker nodes to the Kubernetes cluster. On each worker node, run the following command provided by the kubeadm init output from the master node:
kubeadm join : --token --discovery-token-ca-cert-hash sha256:
Replace
Step 6: Verify the Cluster Setup
Once you’ve joined all the worker nodes to the cluster, you can verify the setup by running the following command on the master node:
kubectl get nodes
If everything is set up correctly, you should see all the nodes in the cluster listed with their statuses.
Conclusion
That’s it! You’ve successfully installed Kubernetes on your system and set up a cluster to deploy and manage your containerized applications. Remember to refer to the official Kubernetes documentation for advanced configuration and management options.
Happy containerizing!
